

Since its launch in 2022, Midjourney has been a game-changer for the internet's supply of adorable cat photos. AI-generated cat illustrations are almost everywhere. Tabbies sip catnip tea, wear designer clothes, and sport rainbow-colored fur.
However, few people realize how much artificial intelligence, or AI, programs—Midjourney specifically—have improved in just a few years, or the wide range of products authors can now create for their book launches using the program. If you combine Midjourney illustrations with other programs and apps like Canva, Vellum, Pixelmator Photo, and/or Adobe Photoshop to edit and format your images, you can create custom-designed book launch materials, from bookmarks to chapter headings to full-wrap dust jackets for your hardcover books. And while it can be difficult to find diverse characters or futuristic settings on stock photo sites, it’s no problem for an AI program to generate those images.
It just takes practice and a little help writing your prompts.
When it comes to your prompts, you’ll need to learn the correct ratios and descriptive keywords and even the proper use of punctuation, but this article will give you tips and a few sample prompts to get you started. As of March 17, Midjourney has just launched its fifth version of the program. According to Midjourney’s announcement to subscribers, the new V5 base model is currently in Alpha Test mode and is said to have “much wider stylistic range … higher image quality … more detailed images … improved performance, [and] improved dynamic range.” The prompts and images in this article have been tested in V4, but you can also try them in V5.
Note: The example images shown in this article have not been edited from Midjourney’s original output except to add text where applicable, but any necessary changes could be made in photo-editing programs after downloading the images from the AI.
1. Illustration Style
Before you begin, it’s a good idea to choose an illustration style. Think about the underlying themes and the genre of your book. If it’s moody and dark, then a black and white ink style might work well. But if your story is a light, hopeful fantasy, you’ll probably want a more colorful, painterly style. Play around with art styles and include those descriptive keywords in your prompts. However, please do not use actual artists’ names in your prompts. You don’t want to cross into morally or legally gray areas that may offend the artists in question.
Pro Tip: The below prompt works well in V5 and can be used in other ratios to gain experience using the program. In general, images need less touch-up in V5 and can be generated in 2:1 and 3:1 aspect ratios—abbreviated to “ar” in the example prompt—with success.
Sample prompt:
A mysterious island in the Puget Sound as a symbol in a YA illustration, tall elegant trees, mist, fairy lights, purple color palette --ar 2:3
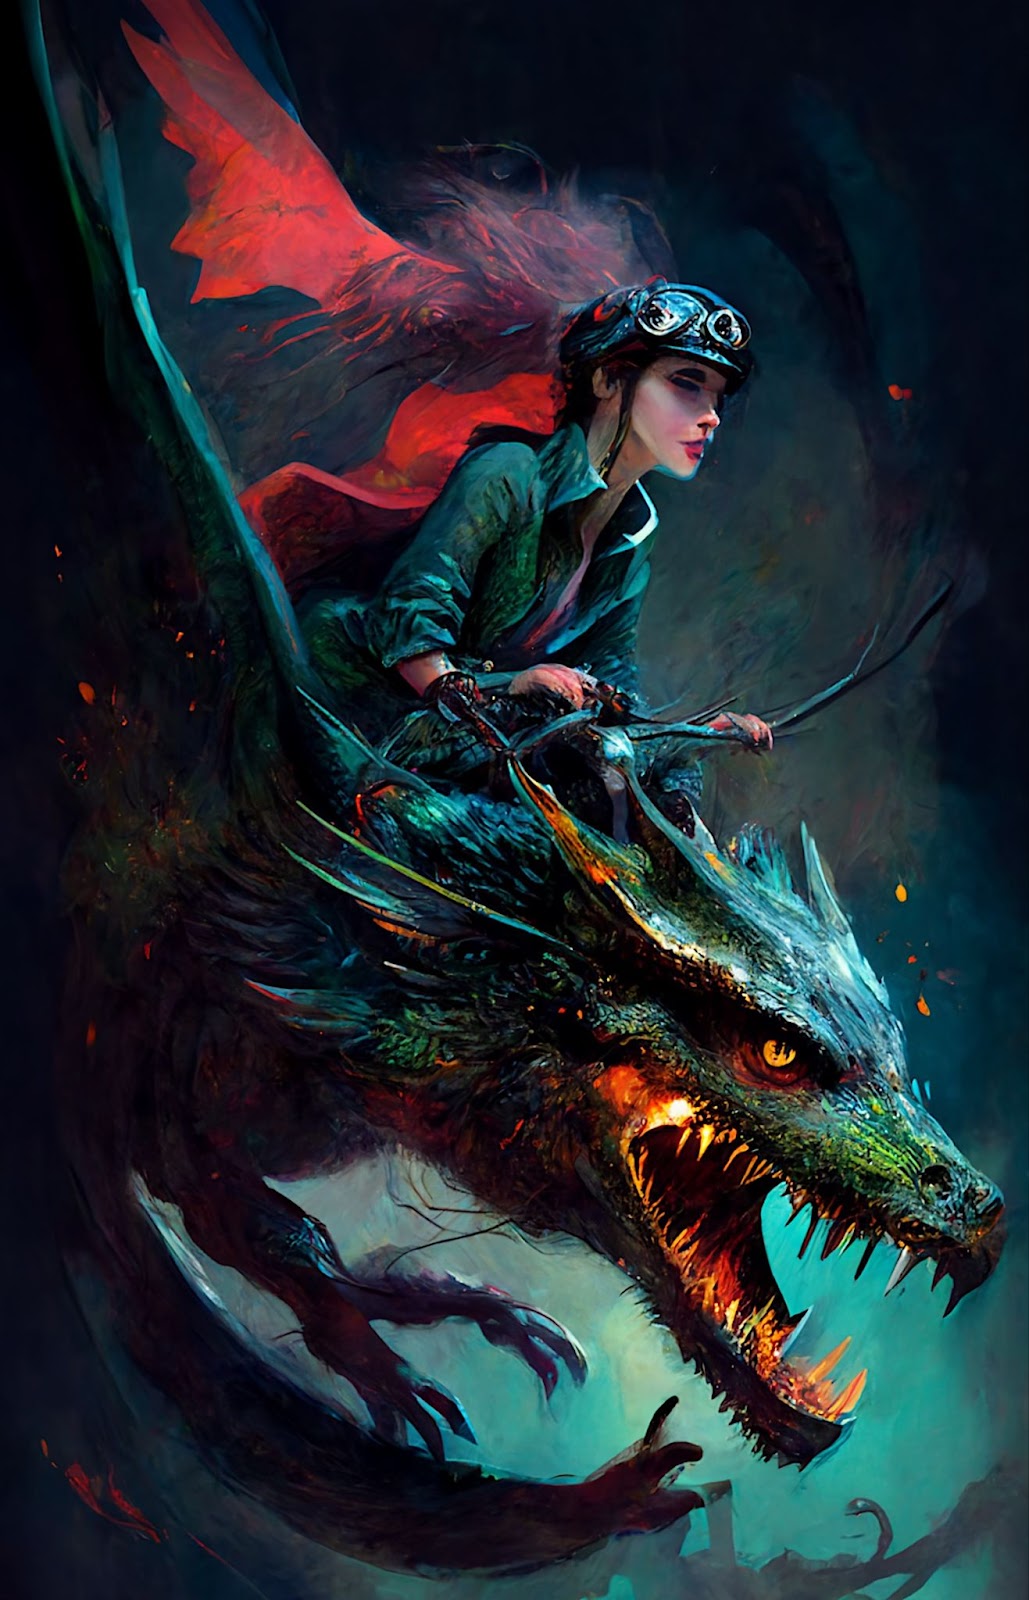
2. Your Characters
You know your characters better than anyone, and with AI-powered design software, you can now bring those people—or aliens or animals—to life. You can then use the images you create throughout your book’s marketing campaign.
Size ratio is important. Begin by making your characters in either a 2:3 or a 9:16 format. Once you have about eight character illustrations, import them into Canva, a free online design program. There, you can design digital or print projects, like character postcards or bookmarks, to give to your readers.
Sample prompt:
Realistic woman is riding on a flying dragon, in a dark fantasy world, epic, fairy tale, magical realism, superhero fiction, sword and sorcery, book illustration, magical color palette --ar 2:3
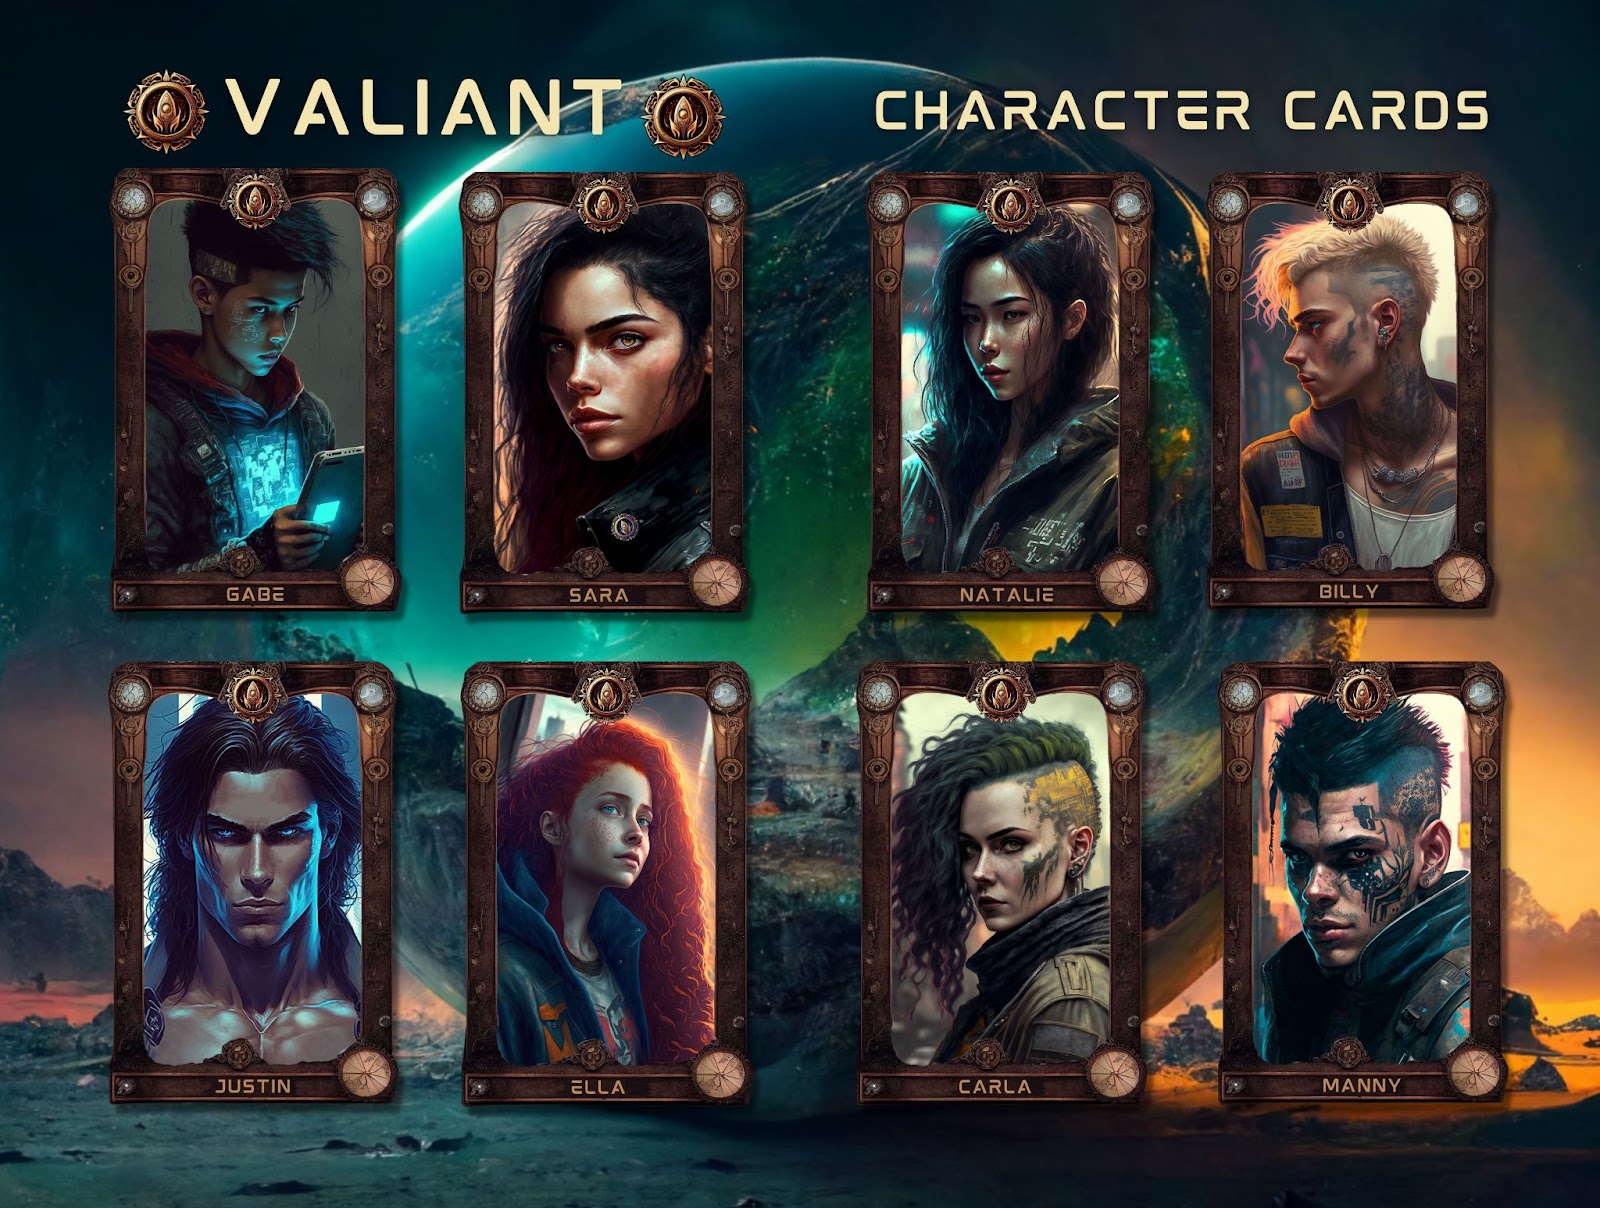
3. Character Cards
The first project you can make with your illustrations is a set of character cards to be included in the front or back of your book or as a separate print for your fans to purchase. Once again, start with a 2:3 size ratio, then individually import each illustration into Canva. Consider giving each one a black background border, then download those final images. Next, create a two-page spread for your book in Canva, give it a background, and import and position those eight character cards.
Be careful not to place any illustrations across the center spread, or where your book’s spine will be, since those images might not line up during the printing process. Download your final two-page spread, drop it into your book formatting program—Vellum is excellent for this—and boom, you’re giving readers a first-hand glimpse of your characters when they purchase your books.
Pro Tip: You can also use your two-page character spread for digital promotions and print giveaways. Just remember to adjust the resolution to 300 dpi for all items you plan to print. If you’re working on a Macintosh computer, just open your image in Preview, go to Tools on the toolbar, select Adjust Size, change the resolution to 300 dpi, and save.
4. Bookmarks
The images you’ve created so far can be repurposed yet again as bookmarks advertising your books. These will be printed, so choose your printer and select a size for your bookmarks. Most have dimensions somewhere between 2 inches × 6 inches and 2 inches × 8 inches. Create a custom-size design in Canva in the proper size, and include the dimensions for a full-bleed if you want your printed image to extend beyond the bookmark’s edge. For simplicity and consistency, use the same background as your two-page character card spread. Next, import three of your character card images, and line them up vertically on your bookmark design.
Pro Tip: Put the name of your book and your website in small print at the bottom of your bookmark and you’ve created a one-sided promotional piece that you can get printed, sign the back, and send to your readers.
5. Interior Illustrations
Most likely, you’ll use your character illustrations for your book interior as well. Remember to increase the resolution to 300 dpi, since these will be printed. Touch up any imperfections in your images, using either Adobe Photoshop, Pixelmator Photo, or any other image-editing program you prefer, and size each one to fit a single page.
Pro Tip: If you use a print-on-demand printer like BookVault, you may be able to opt for a few or all of your illustrations to be printed in color inside your book.
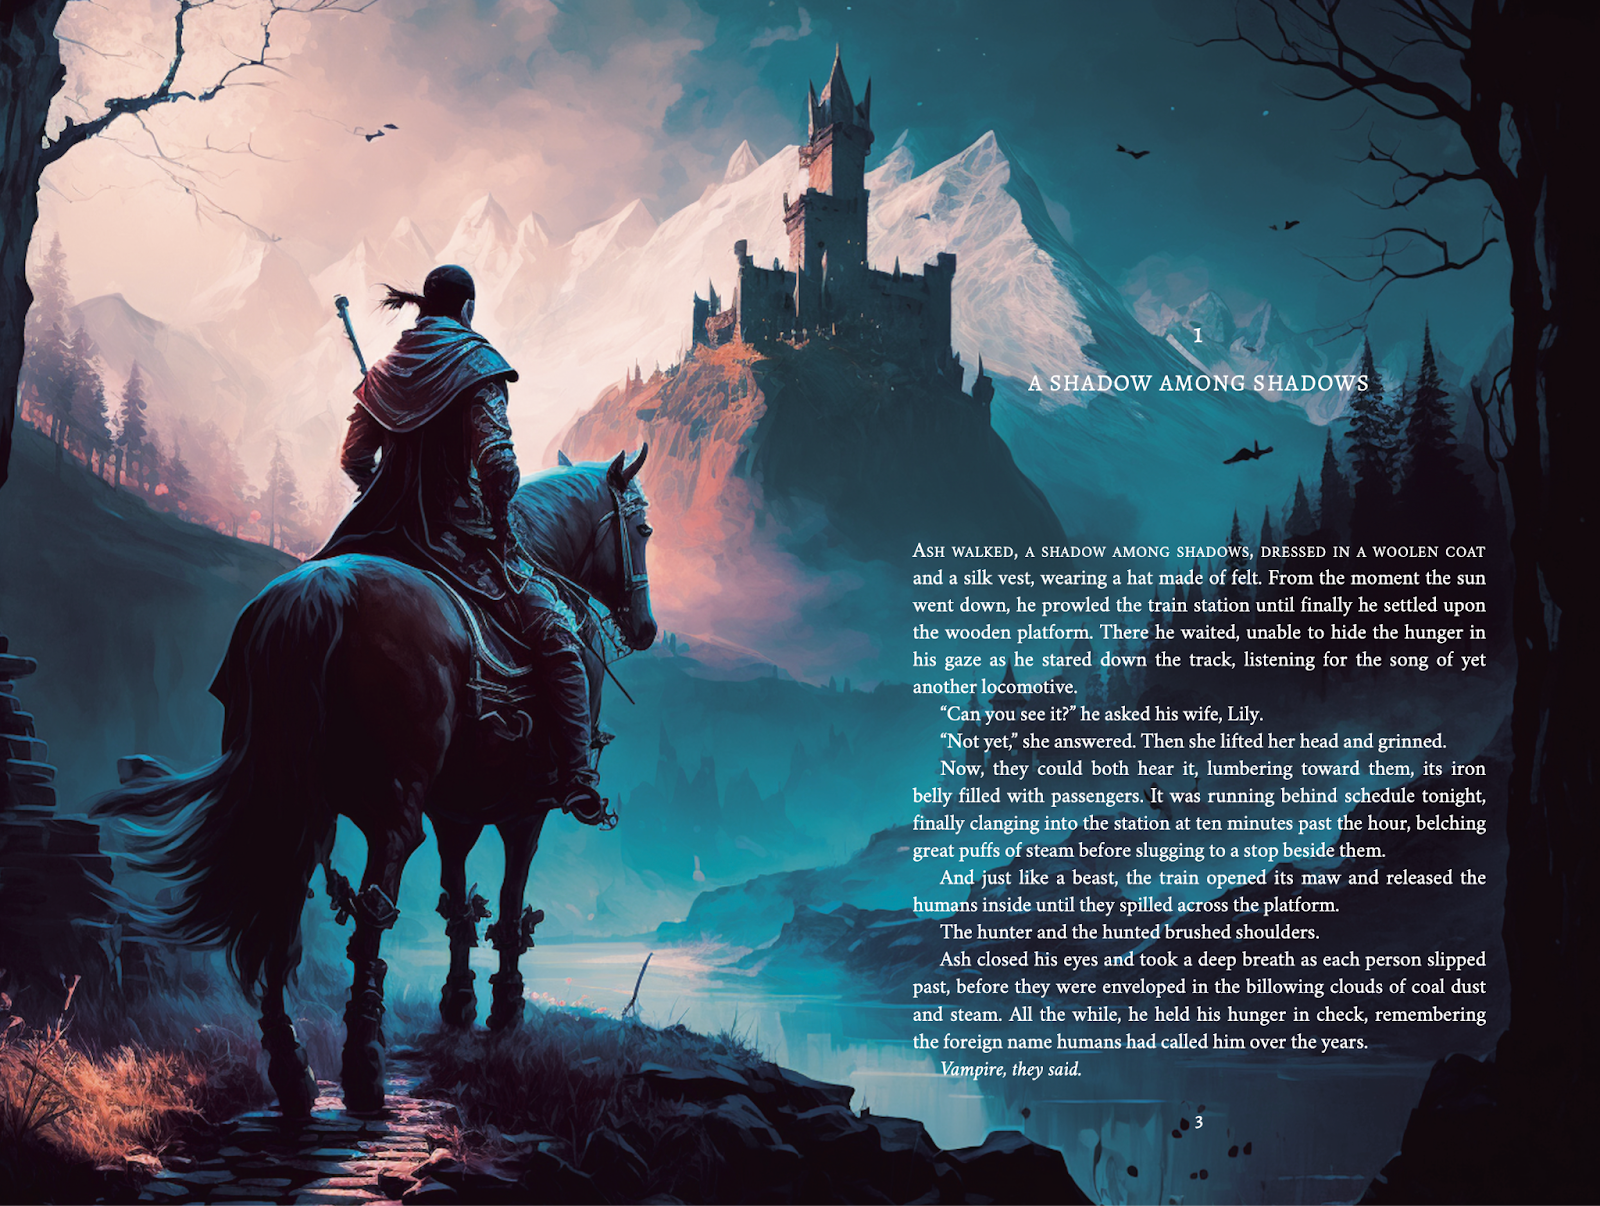
6. Custom Chapter Headings
Custom-designed chapter headings can help to create a boutique book experience. For this project, you can choose to illustrate a setting from your book or one of your characters—or both, as you’ll need a foreground and a background for the final product. Remember, all the art inside your book and on your cover should coordinate, have similar colors, and be in a similar art style. It may take you several tries to get an illustration that works for this, but don’t give up.
If you’re working in Midjourney V4, generate your image with a 3:2 ratio; if you’re using V5, you can try 2:1 or 3:1. Once you get your image, import it into Vellum or a comparable formatting program. If using Vellum to create a custom chapter heading, go to the Styles section, choose a style, then click on the Configure Style icon. Once you’re inside the next section, click on Heading Background. Select the two-page Image Span and Full Bleed Image Extend. Once you do this, Vellum will let you know the exact dimensions your image needs to be—note that you may need to adjust the size of your image a bit. Other things that will need to be selected are in the Print Settings. Click on Text Adjustments and select Chapter Begin, right side. You can also select whether you want your images in color or in black and white.
Pro Tip: For this project, having a dark or misty background works to your advantage since your text will flow on top of it. If your background is dark, switch your book text to white.
Sample prompt:
Left, foreground: Realistic man riding a horse, in a dark fantasy world:: background: mists and mountains and a distant castle:: epic, fairy tale, magical realism, superhero fiction, sword and sorcery, book illustration, magical color palette --ar 3:2
7. Book Covers
For authors who want to truly test Midjourney’s mettle, consider using the program’s outputs to generate your book’s cover—or at least the images that you’ll combine to make it. If you want to create more than one book cover, consider combining your Midjourney illustrations with Canva. You could create one cover for a hardcover dust jacket, a different cover for the hardcover case laminate, and a third cover for the coordinating paperback.
Start with your template—which can be easily obtained from your printer—and import that template into Canva. Select two character or setting illustrations from your interior illustrations. Use one for the front cover and another one for the back. At this point, you may need some expert assistance in selecting and using fonts, in creating your spine text, and in placing and formatting sales information on your flaps.
Pro Tip: Midjourney’s V5 has some new size ratios—2:1 and 3:1—that work amazingly well for a dust jacket and can often cross the spine and even stretch to cover both side flaps.

As indie authors, most of us already know how to write, edit, format, and publish our books. However, with the new artificially intelligent art tools available to us, we now have the opportunity to create top-shelf, boutique-quality books for our readers on our own as well.